

MongoDB
Bart Maertens


What is data testing, and why should you test your data?
Apache Hop is a data engineering and data orchestration platform that allows data engineers and data developers to visually design workflows and data pipelines to build robust solutions.
However, building data pipelines is just the start. You not only want to run your workflows and pipelines in production reliably and without errors, you also want to make sure your data is processed correctly and exactly the way you want it to.
This is where unit testing comes in. In standard software development, developers often write tests before they develop the actual functionality (TDD, or Test Driven Development). Unit tests validate the functionality of an application, from low-level to high-level. Unit tests often are integrated into the entire software build process and are executed automatically as part of your CI/CD and DevOps processes.
Apache Hop is a visual data development platform. However, low or even no-code development doesn't mean the traditional development best practices do not apply. Quite the opposite is true: unit testing should be an indispensable tool in your data practices.
Apache Hop unit tests not only allow you to work test-driven, they also allow you to build regression tests to make sure that an issue that was once fixed remains fixed. Each major data issue that is fixed in your project should be verified by a test that is added to your test library.
Testing lets you build more reliable data engineering projects. Let's take a closer look at how unit tests work in Apache Hop.
Unit tests in Apache Hop
Testing lets you verify your pipelines process your data exactly how you expect them to.
To test if a pipeline works correctly, Apache Hop uses data that is generated by a pipeline with a known result, also known as the Golden Dataset.
If the data that is generated by your pipeline matches this golden dataset, the test succeeds. If there is any mismatch between the generated result and the golden dataset, the test fails.
Let's have a look at the basics first. Later in this post, we'll cover a number of tweaks you can apply to your pipeline unit tests.
Hop unit tests can speed up development in a number of cases:
- Pipelines without design time input: mappings, single threader, etc.
- When input data doesn’t exist yet, is in development, or where there is no direct access to the source system.
- When it takes a long time to get to input data, long-running queries, etc.
PRO TIP: Apache Hop uses unit and integration tests internally to test Apache Hop. Check out the integration tests folder in the Apache Hop source code. Each of the integration test subfolders is a hop project that you can add in Hop Gui. These are not only useful to learn more about unit and integration testing, but can also serve as samples to find out how some of the functionality in Apache Hop works.
Main components of a unit test
Hop uses the following concepts (metadata objects) to work with pipeline unit tests:
- Dataset: a set of rows with a certain layout, stored in a CSV data set. When used as input we call it an input data set. When used to validate a transform’s output we call it a golden data set.
- Unit test: The combination of input data sets, golden data sets, tweaks, and a pipeline.
- Unit test tweak: the ability to remove or bypass a transform during a test
You can have 0, 1, or more input or golden data sets defined in a unit test, just like you can have multiple unit tests defined per pipeline.
The default dataset folder can be specified in the project dialog. Check the 'Data Sets CSV Folder (HOP_DATASETS_FOLDER)'. By default, the value for the ${HOP_DATASETS_FOLDER} variable is set to ${PROJECT_HOME}/datasets.
Unit test in runtime
When a pipeline is executed in Hop GUI and a unit test is selected the following happens:
- All transforms marked with an input data set are replaced with an Injector transform
- All transforms marked with a golden data set are replaced with a dummy transform.
- All transforms marked with a "Bypass" tweak are replaced with a dummy transform.
- All transforms marked with a "Remove" tweak are removed
These operations take place on an in-memory copy of the pipeline unless you specify a pipeline file location in the unit test dialog.
After execution, the output for transforms that have a Golden Dataset assigned to them is validated against the Golden Dataset and logged.
If the generated output for that transform doesn't exactly match the corresponding dataset, the test fails and a dialog will pop up when running in Hop Gui.
Unit test and dataset options
The 'Unit Testing' category in the transform context dialog (click on the transform's icon to open) contains the available unit testing options:

- Set input data set: For the active unit test, it defines which data set to use instead of the output of the transform.
- Clear input data set: Remove a defined input data set from this transform unit test.
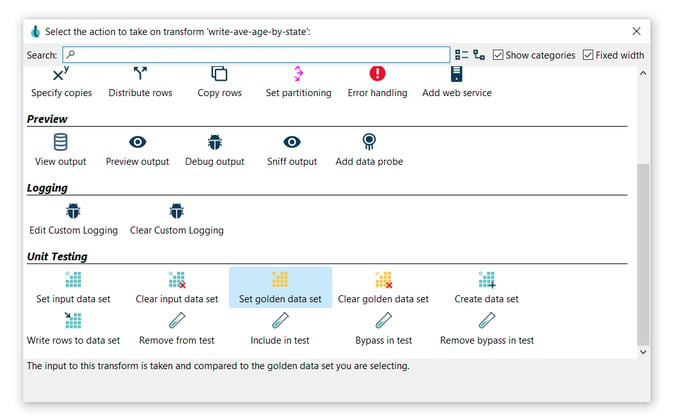
- Set golden data set: The input to this transform is taken and compared to the golden data set you are selecting.
- Clear golden data set: Remove a defined input data set for this transform unit test.
- Create data set: Create an empty data set with the output fields of this transform.
- Write rows to data set: Run the current pipeline and write the data to a data set.
- Remove from test: When this unit test is run, do not include this transform.
- Include in test: Run the current pipeline and write the data to a data set.
- Bypass in test: When this unit test is run, bypass this transform (replace with a dummy).
- Remove bypass in test: Do not bypass this transform in the current pipeline during testing.
Creating data sets is also possible from the 'New' context menu or metadata perspective.
Step 1: Create the datasets
Consider the following basic pipeline below. This pipeline reads data from a CSV file, extracts the years from the date of birth, counts rows by this year, sorts, and writes out to a file.
We’ll use this example to create a test to verify the output of the pipeline is what we expected.
We will create a dataset for the read-customers transform and a dataset for the write-ave-age-by-state transform.
- To create the first dataset, click on the read-customers transform icon to open the context dialog:
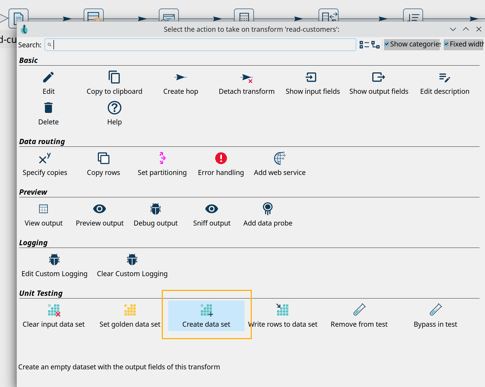
- Click the Create data set option. The popup dialog already shows the field layout in the bottom half of the dialog:

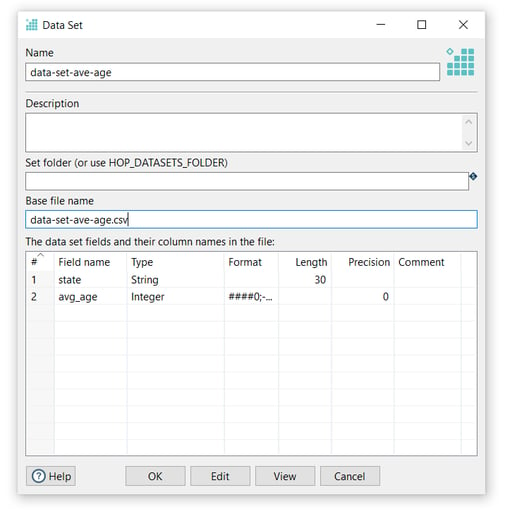
Now it’s time to configure the data set, set your values as in the following example:

- Name: The data set name (data-set-customers)
- Set folder (or use HOP_DATASETS_FOLDER): The name of the folder where the base file is located (leave it empty and create a datasets folder in your Hop project)
- Base file name: The name of the file to be used (data-set-customers.csv)
- The data set fields and their column names in the file: This table is a map of rows and columns that make up the data set and it’s automatically generated.
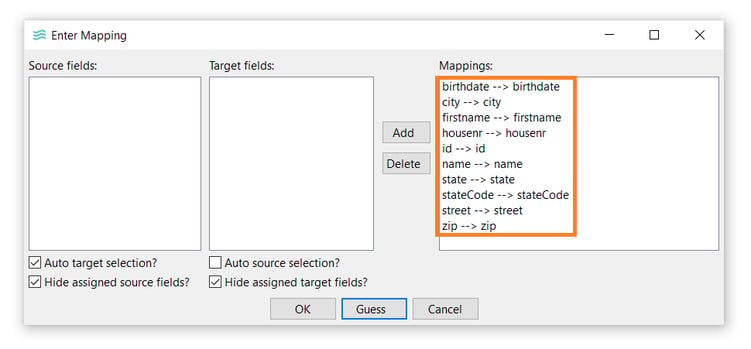
- The Enter Mapping dialog allows you to map transform output fields to data set fields. For this example, just click Guess → OK.

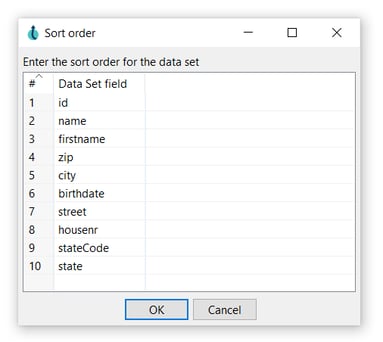
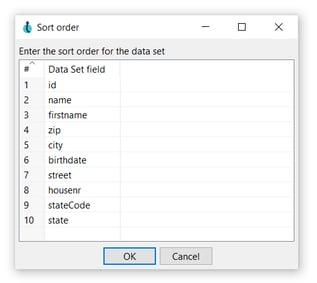
The sort order for the dataset can be modified.
- Do the same for the output transform you’ll want to check the data for (write-ave-age-by-state in the example). We configured the data set as in the following image:
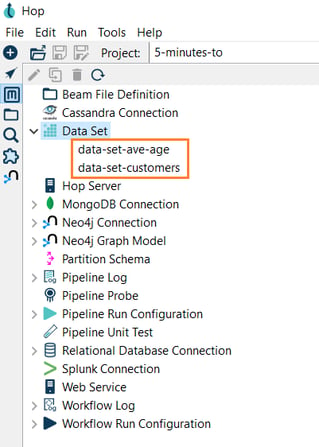
Check the metadata perspective. You should now have two data sets available.
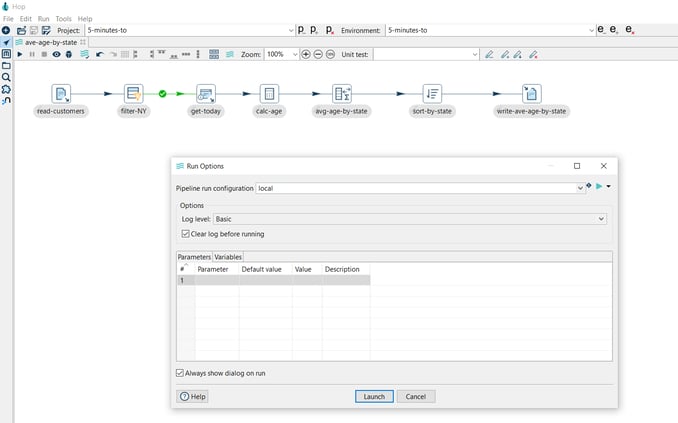
- Run your pipeline after creating the datasets:
Step 2: Write data to the data sets
To write data to the newly created data sets, you can follow the steps:
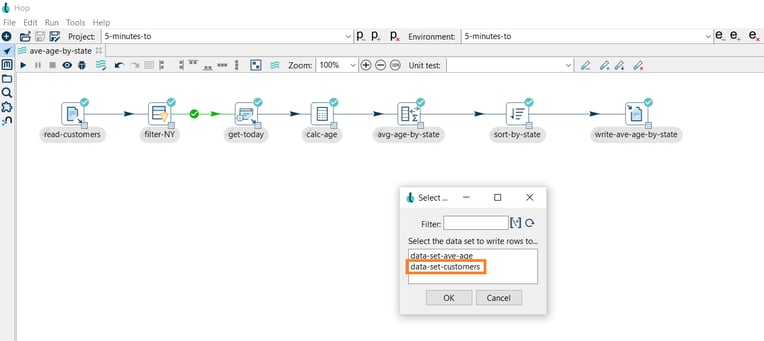
- Click the read-customers transform icon again, and then click Write rows to data set.
- You’ll get a popup dialog asking you to select the data set, select data-set-customers, and click OK.
- The Enter Mapping dialog allows you to map transform output fields to data set fields. For this example, just click Guess → OK.

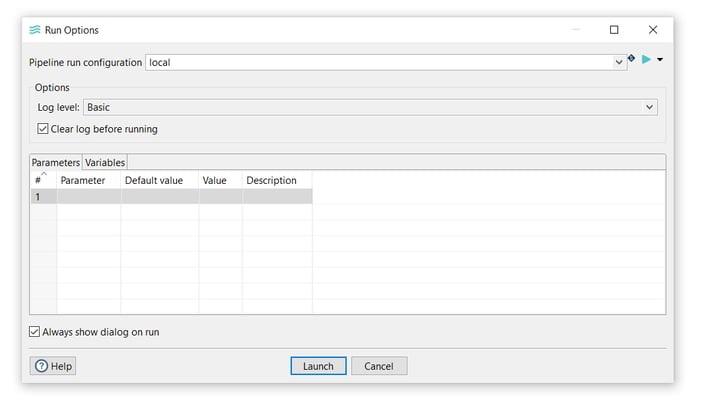
- The Run Options dialog will appear, click Launch to write data to the data set:
- Check the data-set-customers.csv file in the datasets folder.
Repeat for the write-ave-age-by-state transform and data set.
Step 3: Create the unit test
Click the + icon (highlighted) in the unit testing toolbar to create a new unit test. Previously created unit tests will be available from the dropdown box for editing.

The Pipeline Unit Test dialog displays the following values by default:
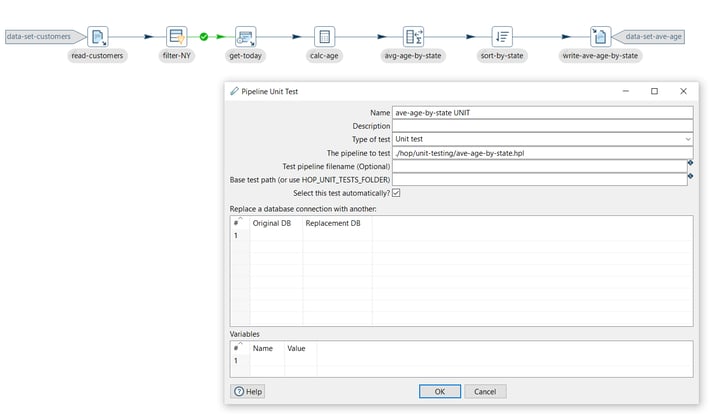
To configure the unit test, set your values as in the following example:
- Name: The unit test name (ave-age-by-state-unit).
- Type of test: Choose Unit test or Development (Unit test).
- The pipeline to test: The pipeline this test applies to. By default, you should see the active pipeline filename here. (./hop/unit-testing/ave-age-by-state.hpl)
You’ll get a popup dialog:
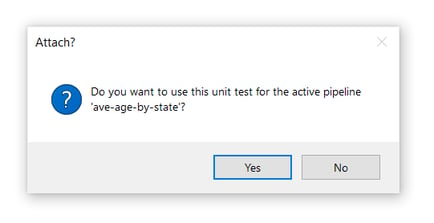
Since we’re creating a unit test for the active pipeline in this example, confirming is fine.
Step 4: Set input and golden data sets
To set the input data set click the read-customers transform icon again, select Set input data set.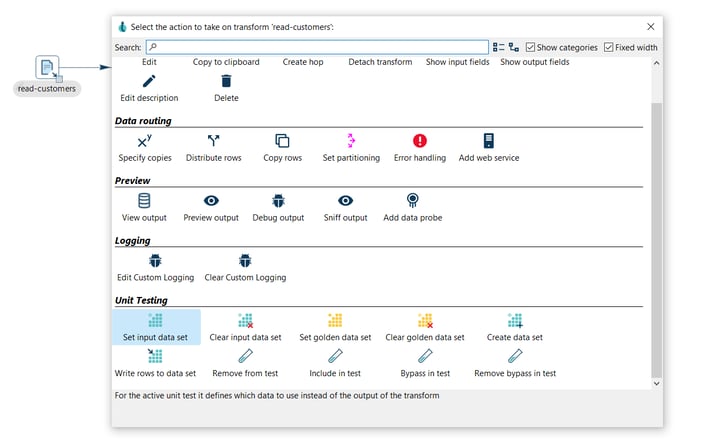
- You’ll get a popup dialog asking you to select the data set, select data-set-customers and click OK.

- The Enter Mapping dialog allows you to map transform output fields to data set fields. For this example, just click Guess → OK.
- Confirm or modify the sort order for the data set.
Note the data set indicator on read-customers transform.

- Repeat for write-ave-age-by-state, but using the Set golden data set option.
Your pipeline now has two new indicators for the input and output data set.

Step 5: Run the unit test
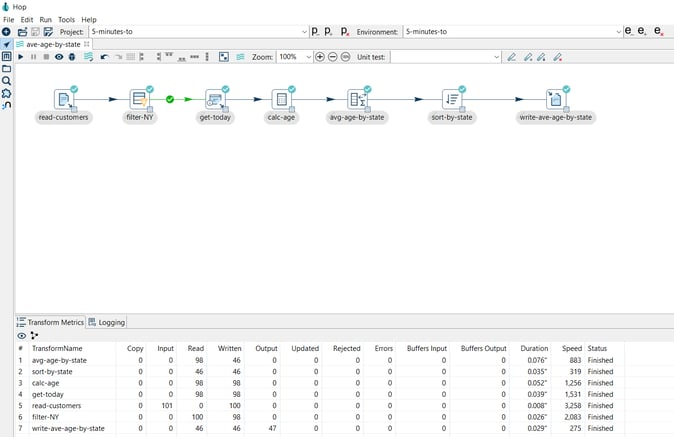
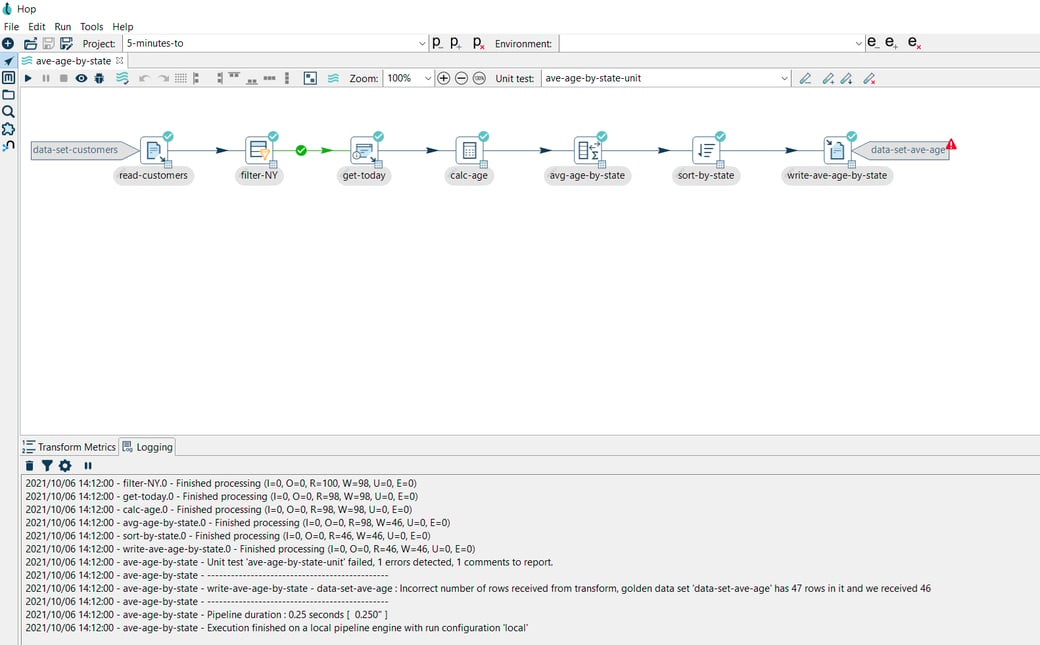
If the pipeline runs with all tests passed, you’ll receive a notification in the logs:
20221/04/21 21:16:43 - read-customers - Unit test 'ave-age-by-state-unit' passed succesfully
2022/04/21 21:16:43 - read-customers - ----------------------------------------------
2022/04/21 21:16:43 - read-customers - customers by year out - customers-by-year : Test passed succesfully against golden data set
2022/04/21 21:16:43 - read-customers - Test passed succesfully against unit test
2022/04/21 21:16:43 - read-customers - ----------------------------------------------
2022/04/21 21:16:43 - read-customers - Pipeline duration : 0.108 seconds [ 0.108 ]
2022/04/21 21:16:43 - read-customers - Execution finished on a local pipeline engine with run configuration 'local'
If changes to the pipeline cause the test to fail, a popup will be shown for the failed rows.
In the example below, the number of rows, causing the test to fail:

With these basic unit tests in place, there may be situations where you want to exclude certain transforms or even entire substreams from testing in your pipelines. To accommodate this, you can bypass and remove transforms in a pipeline, which is what we'll discuss in the next sections.
Bypass and remove transform in unit tests
The basic scenario we covered earlier just runs a unit test pipeline "as is". That works just fine for basic unit tests, but there are use cases where you may need more tweaks. You may want to exclude some transforms or substreams from the tests for your pipeline.
Unit tests in Apache Hop provide two options to exclude parts of a pipeline from a unit test:
- bypass a transform from the unit test. Transforms that are bypassed will be replaced with a dummy transform when the unit test runs.
- remove a transform from the unit test. This will cut all hops from incoming transforms to this transform, effectively cutting the stream flowing through this transform (and any of the following transforms).
Let's take a closer look at a couple of examples. As always, the examples here use a Hop project with environment variables to separate code and configuration in your Hop projects.
Sample unit test 1 - Bypass
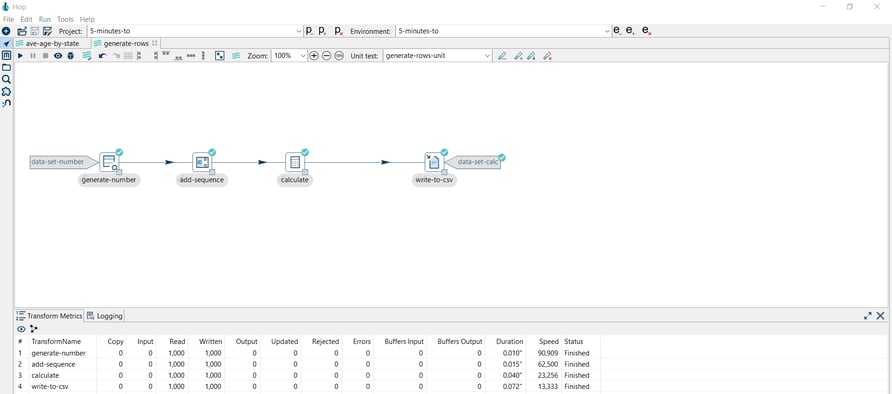
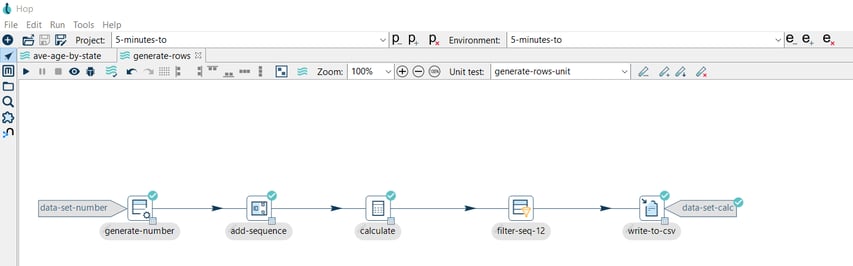
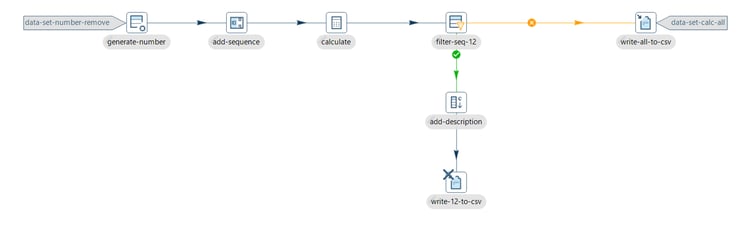
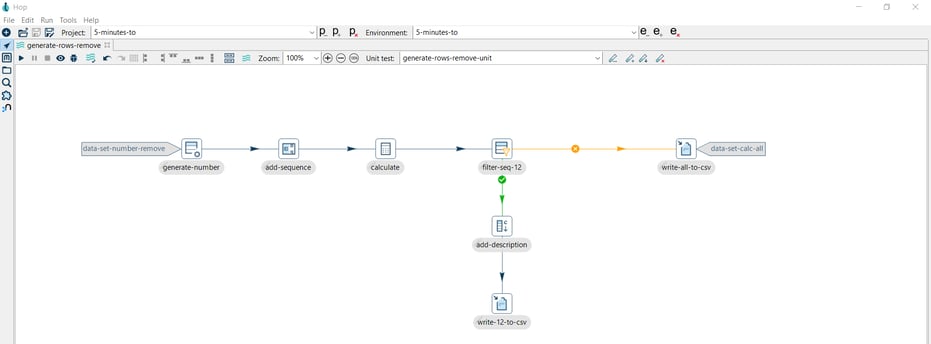
The following pipeline generates a simple calculation from a generated number column and writes the results to a CSV file. The generate-rows-unit unit test includes the following datasets:
- data-set-number as the input dataset
- data-set-calc as the golden dataset
If you run the pipeline with no modifications, you’ll receive a notification in the logs:
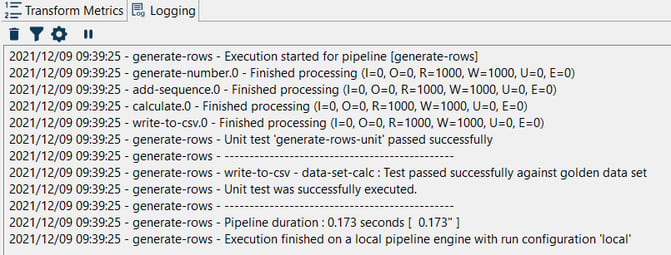
But if we, for example, add a transform to modify the stream, the results will cause the test to fail.
In this case, we’re filtering the row with sequence=12 and when we run the pipeline a popup is shown for the failed rows:

Note that the number of rows in the generated data set doesn't match the number of rows in the golden data set, so our test fails.
Bypass transforms in unit tests
What if we want to disable this transform in the pipeline when we run the unit test?
While developing pipelines, you’ll often remove or disable transforms in a pipeline. We can do the same in unit tests.
In our example, we may want to bypass the transform that caused the test to fail (filter-seq-12).
Bypassing a transform in a test will replace the transform with a Dummy transform while executing the test.
To do so follow the steps below.
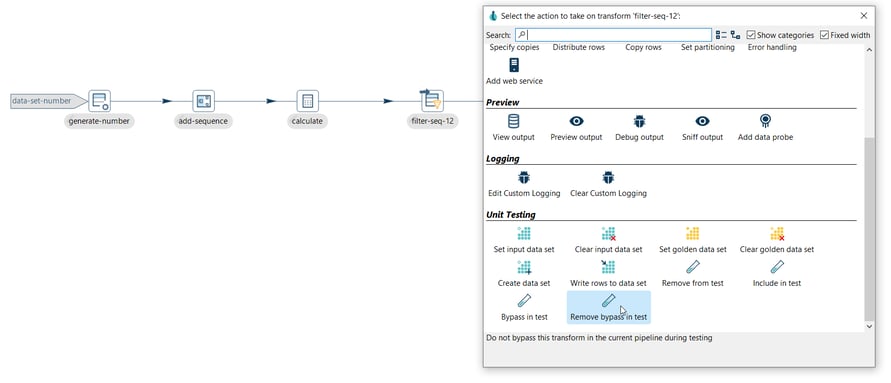
Step 1: Set the transform as a bypass
Click on the filter-seq-12 transform icon and select the Bypass in test option, then you will see an arrow ![]() icon in the transform as in the image below:
icon in the transform as in the image below:

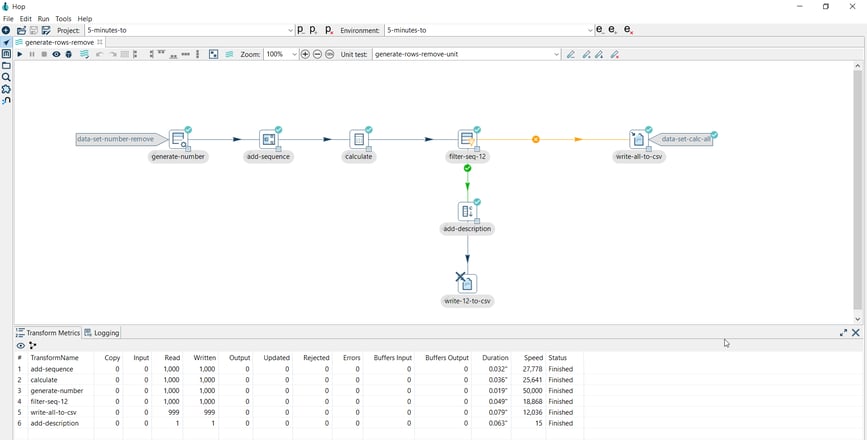
Step 2: Run the pipeline
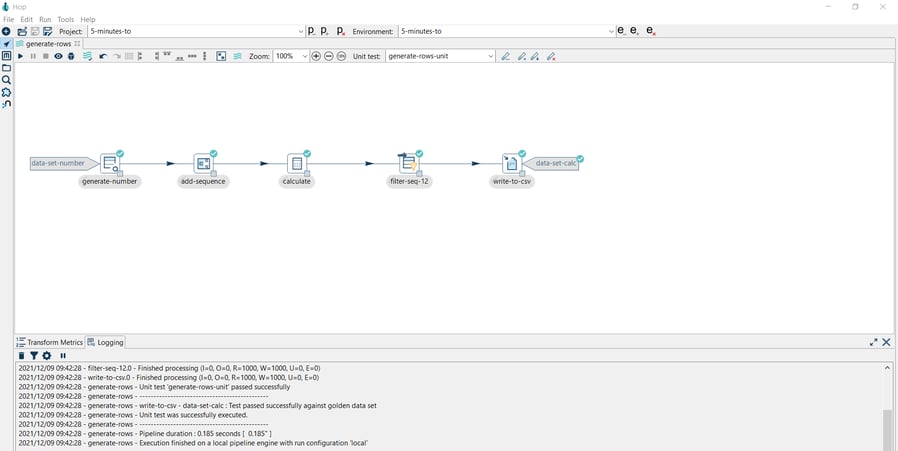
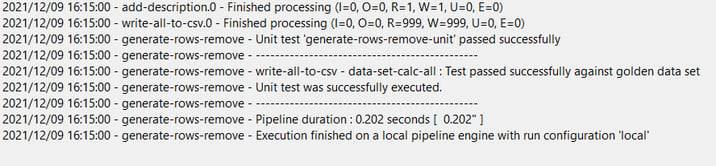
Note that the pipeline runs with all tests passed.
You can use the Remove bypass in test option to enable the transform again. Click on the filter-seq-12 transform icon and select the Remove bypass in test option:
 Then you will see how the arrow
 ![]() icon is removed from the transform as in the image below:
icon is removed from the transform as in the image below:

Sample unit test 2 - Remove
Let’s see another sample pipeline. The following pipeline generates the same simple calculation from a generated number column but in this case, writes the results to a CSV file and the filtered result to another CSV file.
The generate-rows-unit unit test includes the following datasets:
- data-set-number as the input dataset
- data-set-calc as the golden dataset

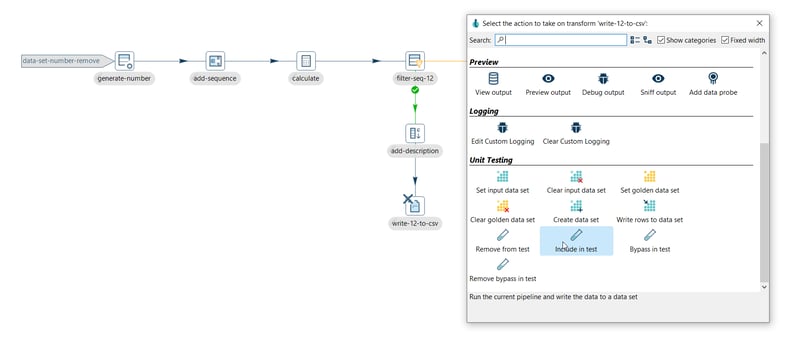
Remove from test
What if you want to exclude the write-12-to-csv transform from the unit test execution? You want to write the false results but not the true results.
Well in this case you can use the Remove from test option.
To do so follow the steps below:
Step 1: Set the transform as removed
Click on the write-12-to-csv transform icon and select the Remove from test option, then you will see an ![]() icon in the transform as in the image below:
icon in the transform as in the image below:
Step 2: Run the pipeline
Note that the pipeline runs with all tests passed.
You can use the Include in test option to enable the transform again. Click on the write-12-to-csv transform icon and select the Include in test option:
You'll notice how the ![]() icon is removed from the transform as in the image below:
icon is removed from the transform as in the image below:
We have all the required tools now to build standard and more advanced pipelines in Apache Hop.
Building and running tests manually, as we've done so far, is useful but it only gets you so far. As your library of unit tests grows, you'll want to have a way to periodically (daily) run all of them. After all, you're interested in test results, not in building tests.
Orchestrate your unit and integration tests
We have all the tools we need to build powerful unit tests now. However, your tests are only useful when you run them frequently. Let's take a close look at how your unit tests can start to really add value to your project by actually running your tests on a regular basis.
You'll typically build unit tests to check the new functionalities in your next release and to verify that there are no regressions, bugs fixed need to remain fixed once and for all.
As you know by now, a unit test is a combination of zero or more input sets and golden data sets along with a number of tweaks you can add to the pipelines prior to testing. Let's take a closer look at how you can run your tests on a regular basis. After all, testing only makes sense when you actually run your tests.
The steps we'll describe below will use Apache Hop to test your Apache Hop project, just like we do in the source code integration tests. That's right, Apache Hop uses Apache Hop to test Apache Hop.
The Apache Hop project uses Jenkins to run unit and integration tests, but since the unit tests are just Apache Hop workflows and pipelines, you can run your unit and integration tests in any CI/CD or scheduler you use. We use GitHub Actions to run tests on a lot of our projects, get in touch or let us know in the comments if you'd like to find out more about GitHub Action tests for your project..
Unit test in runtime
When a pipeline is executed in Hop GUI and a unit test is selected the following happens:
- All transforms marked with an input data set are replaced with an Injector transform
- All transforms marked with a golden data set are replaced with a dummy transform (does nothing).
- All transforms marked with a "Bypass" tweak are replaced with a dummy.
- All transforms marked with a "Remove" tweak are removed
These operations take place on a copy of the pipeline, in memory only unless you specify a hpl file location in the unit test dialog.
After execution, the transform output is validated against golden data and logged. In case of errors in the test, a dialog will pop up when running in Hop Gui.
Execute in workflows
There is a workflow action called "Run Pipeline Unit Tests" which can execute all defined unit tests of a certain type. The output of the transform can be stored in any format or location with regular Hop transforms. Execute the workflow through hop-run, in a scheduler, or through a CI/CD pipeline in e.g. Jenkins.
Step 1: Add and configure the Run Pipeline Unit Test in a new workflow
The Run Pipeline Tests action runs a series of pipeline unit tests. The action is successful if all tests run without error. Errors are logged.
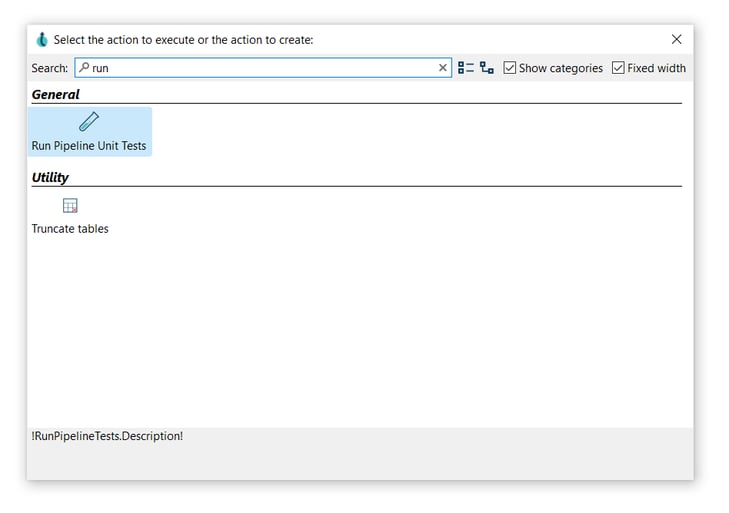
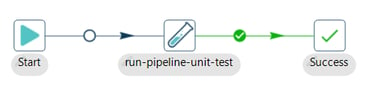
After creating your workflow (run-pipeline-unit.hwf) add a Run Pipeline Unit Test action. Click anywhere in the workflow canvas, then Search 'run' -> Run Pipeline Unit Test.
Now it’s time to configure the Run Pipeline Unit Test action.
Open the action and set your values as in the following example:
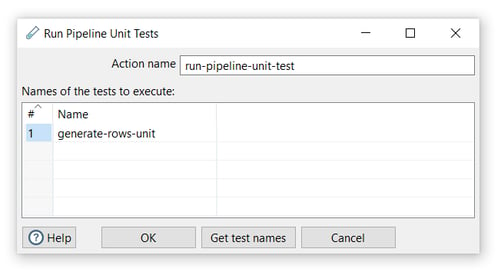
- Action name: choose a name for your action, just remember that the name of the action should be unique in your workflow (run-pipeline-unit-test).
- Use the Get test names option in this action to specify which of the available unit tests you want to include in your workflow In this case, we will use the unit test in the following pipeline that generates a simple calculation from a generated number column and writes the results to a CSV file.

- Connect a Succes action to the run-pipeline-unit-test action.
Step 2: Add and configure the Write to log
The Write To Log action writes a specific string to the Hop logging system. This action is similar to the Write To Log transform.
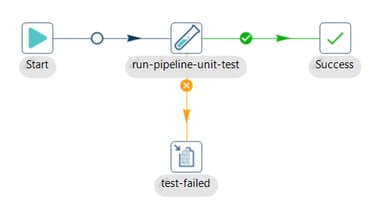
Add a Write to log action to the workflow and configure as follows:
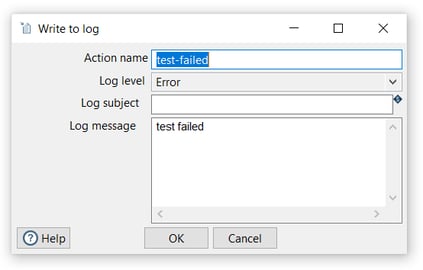
- Action name: choose a name for your action, just remember that the name of the action should be unique in your workflow (test-failed).
- Log level: The logging level to use (Error)
- Log message: The log message to write to the log (test failed)
Step 3: Run the workflow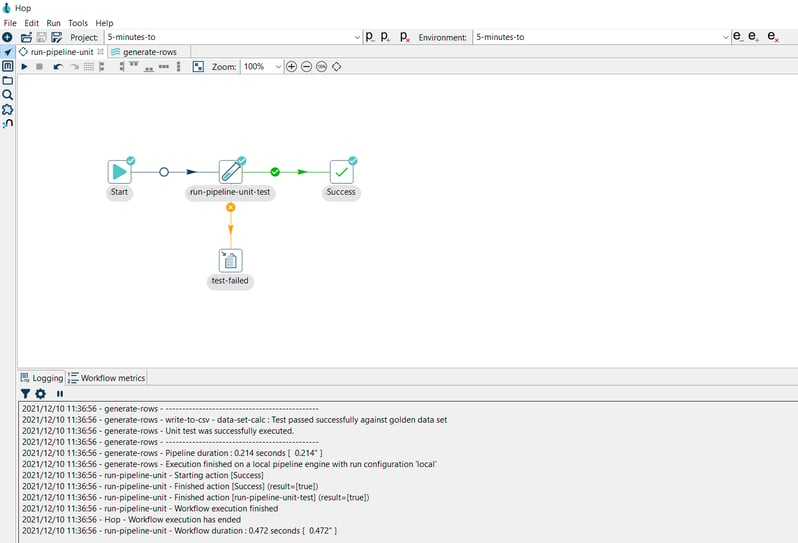
If the pipeline runs with all tests passed, you’ll receive a success notification in the logs:
2022/12/10 15:21:56 - generate-rows - Unit test 'generate-rows-unit' passed successfully
2022/12/10 15:21:56 - generate-rows - ----------------------------------------------
2022/12/10 15:21:56 - generate-rows - write-to-csv - data-set-calc : Test passed successfully against golden data set
2022/12/10 15:21:56 - generate-rows - Unit test was successfully executed.
2022/12/10 15:21:56 - generate-rows - ----------------------------------------------
2022/12/10 15:21:56 - generate-rows - Pipeline duration : 0.211 seconds [ 0.211" ]
2022/12/10 15:21:57 - generate-rows - Execution finished on a local pipeline engine with run configuration 'local'
2022/12/10 15:21:57 - run-pipeline-unit - Starting action [Success]
Now try modifying the transform to make the test fail. For example, by removing the Bypass option:
 Execute the workflow after modifying the pipeline:
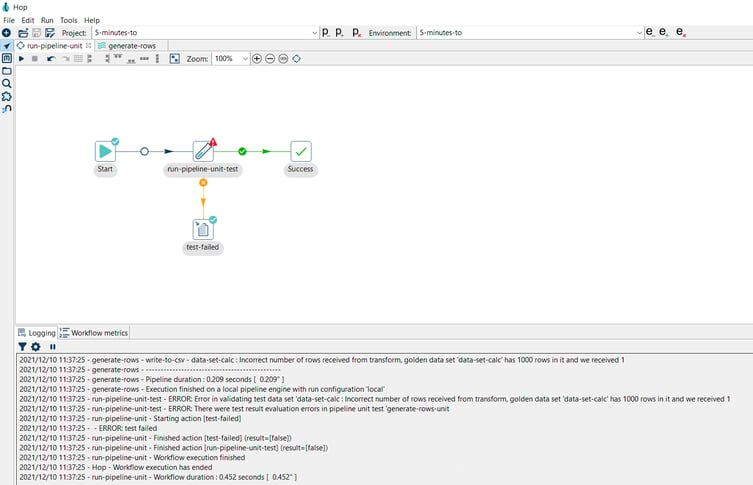
Notice the error message in the logs:
2022/12/10 15:39:41 - generate-rows - Unit test 'generate-rows-unit' failed, 1 errors detected, 1 comments to report.
2022/12/10 15:39:41 - generate-rows - ----------------------------------------------
2022/12/10 15:39:41 - generate-rows - write-to-csv - data-set-calc : Incorrect number of rows received from transform, golden data set 'data-set-calc' has 1000 rows in it and we received 1
2022/12/10 15:39:41 - generate-rows - ----------------------------------------------
2022/12/10 15:39:41 - generate-rows - Pipeline duration : 0.286 seconds [ 0.286" ]
2022/12/10 15:39:41 - generate-rows - Execution finished on a local pipeline engine with run configuration 'local'
2022/12/10 15:39:41 - run-pipeline-unit-test - ERROR: Error in validating test data set 'data-set-calc : Incorrect number of rows received from transform, golden data set 'data-set-calc' has 1000 rows in it and we received 1
2022/12/10 15:39:41 - run-pipeline-unit-test - ERROR: There were test result evaluation errors in pipeline unit test 'generate-rows-unit
2022/12/10 15:39:41 - run-pipeline-unit - Starting action [test-failed]
2022/12/10 15:39:41 - - ERROR: test failed
Unit test error codes
Ideally, all of your unit tests work and life is good. In the not-so-ideal reality, your unit tests may fail with one of two exit codes:
- Incorrect number of rows received from transform, golden data set <GOLDEN_DATASET_NAME> has <GOLDEN_DATASET_ROWS> rows in it and we received <NB_ROWS_FOUND>
- Validation against golden data failed for row number <ROW_NUMBER>, field <FIELD_NAME>: transform value [<FIELD_VALUE>] does not correspond to data set value [<GOLDEN_DATASET_VALUE>]
Run your tests in GitHub Actions
Your unit testing pipelines can be scheduled or, even better, integrated with CI/CD platforms like Jenkins, Github Actions etc.
The screenshot below shows a GitHub Action that runs a workflow or pipeline, orchestrating all of the unit tests in a project. GitHub Actions can be configured to run on a number of actions, for example on every push to the main branch, whether that is a direct commit or a merged pull request.
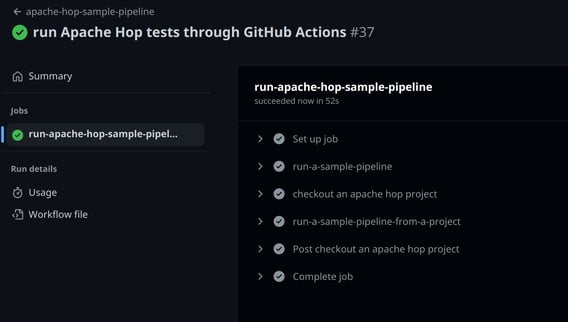
A badge for your GitHub Actions tests in your repository's README notifies everyone involved what the status of your tests is.
![]()
And more time: needless to say, any test failures should be fixed as soon as possible...
Conclusion
You now have all the required tools to build and orchestrate a unit testing framework to improve the quality of your Apache Hop projects.
Let us know in the comments if you found this useful and how we can continue to improve unit testing in Apache Hop to make your data projects even more successful.

Want to find out more? Download our free Hop fact sheet now!


Blog comments