Neo4j is the world's leading graph database management system, designed for optimized fast...
Bart Maertens

What is Apache Hop?
Apache Hop is a visual, metadata-driven data engineering platform that allows data professionals to build and run data pipelines without the need to write code.
Apache Hop was designed and built to support data projects throughout the entire life cycle, from the moment a data point arrives in your organization until it lands in your data warehouse or analytics platform.
Apache Hop has built-in support for hundreds of source and target data platforms. This includes file format, relational, graph and NoSQL databases and many others. Apache Hop is built to process any volume of data: from edge devices in IoT projects over standard data warehousing projects up to distributed platforms that process petabytes of data.
Why Apache Hop?
Hop users visually develop pipelines and workflows using metadata to describe how data should be processed. This visual design enables data developers to focus on what they want to do, without the need to spend countless hours on technical details.
This visual design and the abstraction of the technical details enable data professionals to be more productive. Visual design makes citizen developers more productive when developing data pipelines and workflows than they would be with "real" source code. Even more so, maintaining and updating your own (or even worse, someone else's) workflows and pipelines after a couple of weeks of months is a lot easier when you can visually see the flow of data in the pipeline.
5 steps to a successful Apache Hop project
As with any platform or any project, a good start is half the battle. Hop has all the functionality required to organize your work in projects and keep a strict separation between code (project) and configuration (environments and environments files).
Setting up your Hop projects according to the best practices described below will make your projects easier to develop, maintain, and deploy.
Whether you have previous experience with Pentaho Data Integration (Kettle) and want to upgrade to Apache Hop or are new to Apache Hop, no matter how far you are in adopting a DevOps way of working, a well-designed project and corresponding environments will make your life a lot easier.
Rather than just diving in and creating workflows and pipelines, here are 5 steps you should follow to start working with Hop.
Step 1: Download and start Apache Hop
To download and install Apache Hop use the following guide:
- Download Hop from the download page
- Check the java docs to download and install Java 11 or higher for your operating system.
- Unzip Hop to a folder of your choice.
- You now have access to the different Hop Tools through their corresponding scripts.
- Start the Hop-Gui by using
hop-gui.bat(Windows) or./hop-gui.sh(Linux or Mac)
After starting the Apache Hop GUI, you’ll be presented with the window below:
 The menu bar includes options mainly for managing pipelines and workflows and the Apache Hop GUI configuration.
- The main toolbar includes the New option to create files (pipelines and workflows) and metadata, and the options to manage projects and environments.
- The perspectives toolbar includes switcher icons between the various perspectives.
PRO TIP: Apache Hop stores your configuration in <hop>/config/ by default. Set an environment (system) variable HOP_CONFIG_FOLDER and point it to a folder on your file system to store your Apache Hop configuration outside of your installation. This will let you switch seamlessly between Hop versions and installations.
Step 2: Create a project and an environment
To create a new project click the Add a new project button. This button opens the following dialog: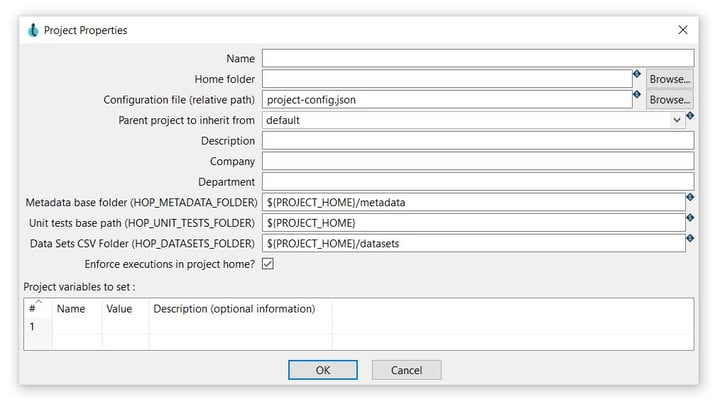
 The project can be configured as in the following example:
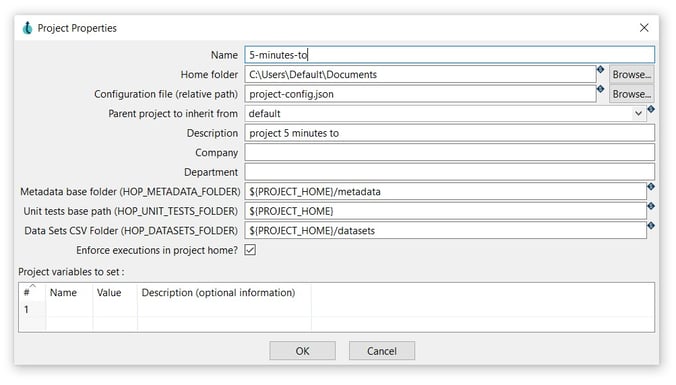

- Name: Choose a unique project name (5-minutes-to).
- Home folder: This is the folder where the project is located (C:\Users\Default\Documents).
- Configuration file (relative path): This is the folder where the project’s configuration JSON is located, by default: project-config.json.
- Parent project to inherit from: You can select a parent project to inherit metadata from (non selected).
- Description: A description for this project (project 5 minutes to).
- Metadata base folder: This is the folder where this environment’s metadata will be stored, by default: ${PROJECT_HOME}/metadata
- Unit test base path: The folder where this environment’s unit tests will be stored, by default: ${PROJECT_HOME}
- Data Sets CSV Folder: The folder where this environment’s data files will be stored, by default: ${PROJECT_HOME}/datasets
- Enforce execution in environment home: Give an error when trying to execute a pipeline or workflow which is not located in the environment home directory or in a sub-directory, by default: checked.
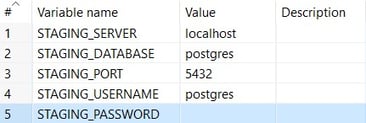
- Project variables to set: A list of variable names, values, and variable descriptions to use with this project.
Insert all fields and click OK.
After clicking OK, the system will show the following dialogs:
- Confirm that you want the first environment for your project.
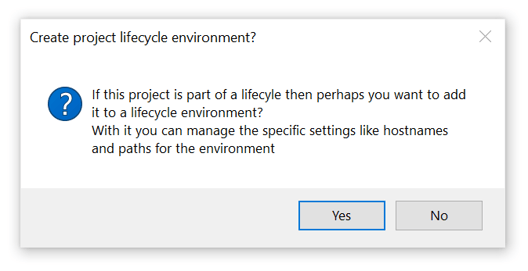
 If you accept by clicking the OK option, you will see the following dialog for creating the environment.
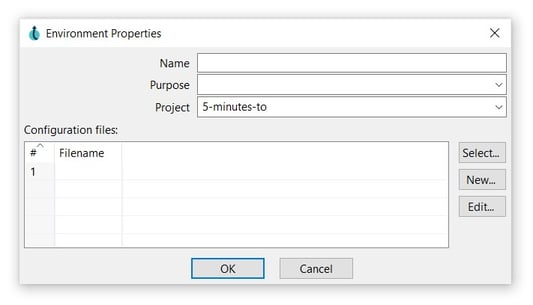

The environment can be configured as in the following example:
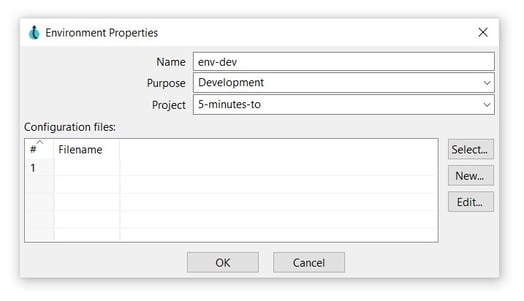
- Name: The environment name (env-dev).
- Purpose: select the purpose of the environment (Development).
- Project: note that the created project is selected by default (5-minutes-to).
- Click the New button and select a directory for the environment file. Click Open and notice that the environment file is added to the Configuration files list.
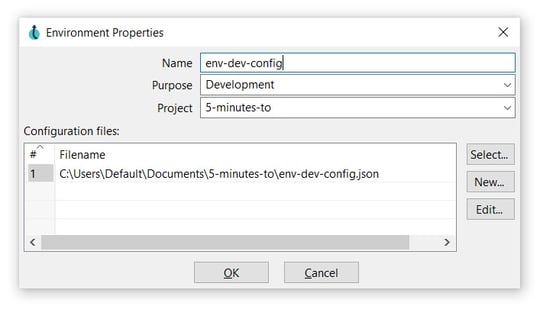
- Click OK to save.
- You can use the Edit button to add variables to your environment file.
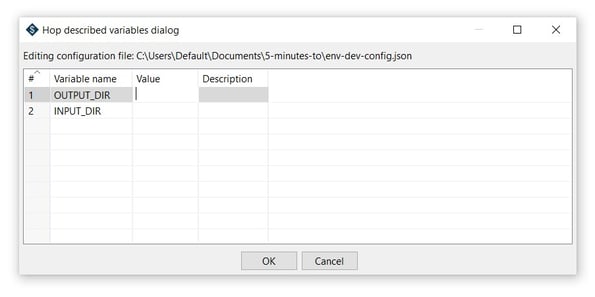
OUTPUT_DIR and INPUT_DIR are sample variables, you can add the values of the input and output directories to be used globally in your environment.
PRO TIP: Environments are unique and can't be shared across projects. You can (and should) share configuration files between environments. A best practice we use internally is to create separate configuration files per database connection etc, and share these between environments.
Step 3: Parameterize everything!
The initial variables we set in “Step 2: Create a project and an environment” are just the start.
Your projects should be transparent and portable: using variables for all file paths, relational or NoSQL database connections, email server configuration, and so on is crucial. Hard-coded values should always raise an alarm. They may not cause problems right away, but sooner or later (probably sooner) one of those pesky hard-coded values will pop up and wreak havoc when you least expect and want it.
Let’s explore using variables to create a relational database connection. Relational Database Connections are a typical type of metadata item that is used throughout your project. You don't want to be reading from or writing to a different database than the one you had in mind.
To create a Relational Database Connection, go to the metadata perspective, right-click on "Relation Database Connection" and select New.
The New Relational Database Connection editor opens, with the following fields ready to be configured.
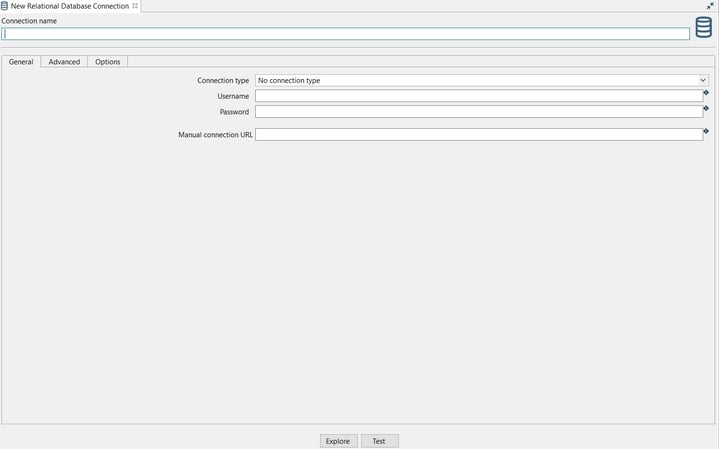
Note that for the configuration fields, you can use variables that can be specified in an environment file.
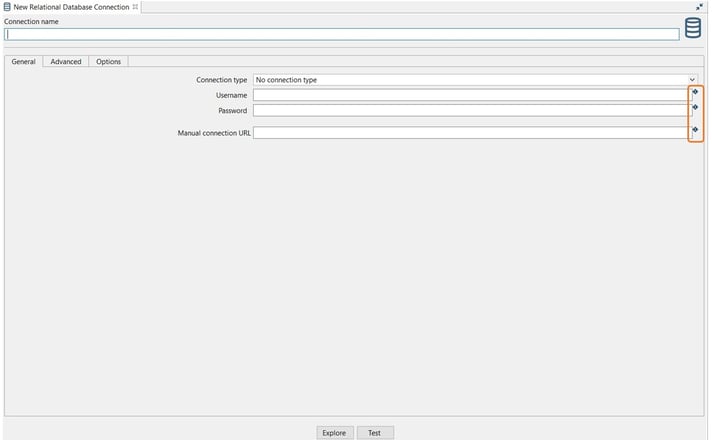
 In this case, you can:
- Add a file that contains the connection variables to the relational database that you are going to configure or …
- Add the variables to the development environment that we configured in the previous step.
Example:
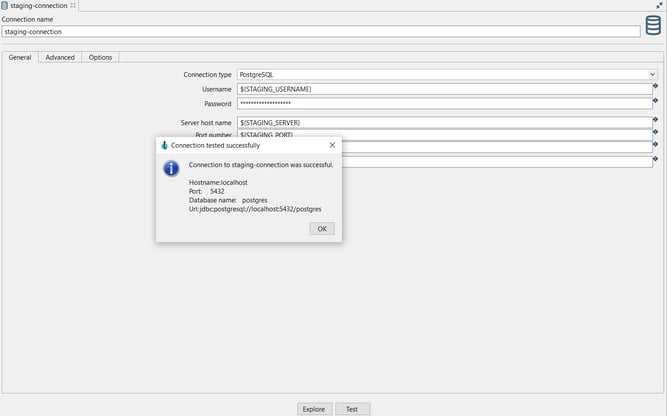
The connection can be configured as in the following example:

 Connection name: the name of the metadata object (staging-connection).
- Server or IP address: the name of the server (${STAGING_SERVER}).
- Database name (4.0): the name of the database (${STAGING_DATABASE}).
- Port: the Bolt port number (${STAGING_PORT}).
- Username: specify your username (${STAGING_USERNAME}).
- Password: specify your password (${STAGING_PASSWORD})
Test the connection by clicking on the Test button.
Step 4: Create a pipeline
Pipelines in Hop perform the heavy data lifting: in a pipeline, you read data from one or more sources, perform a number of operations (joins, lookups, filters, and lots more), and finally, write the processed data to one or more target platforms.
To create a Pipeline, hit CTRL-N click on the New -> Pipeline option or click on the File -> New -> Pipeline option.
Your new pipeline is created, and you’ll see the dialog below.
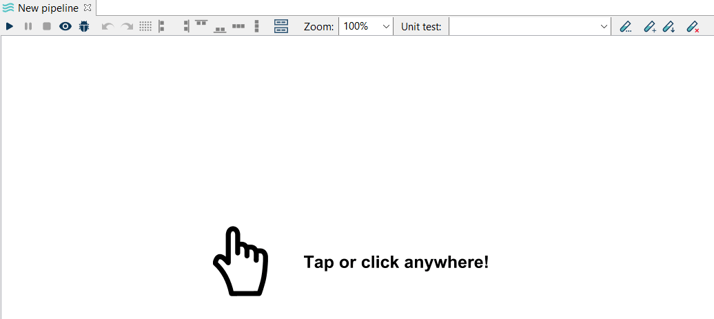
Now you are ready to add the first transform. Click anywhere in the pipeline canvas and you will see the following dialog:
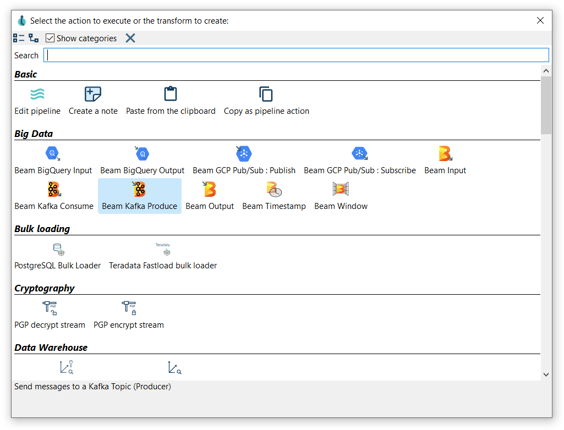
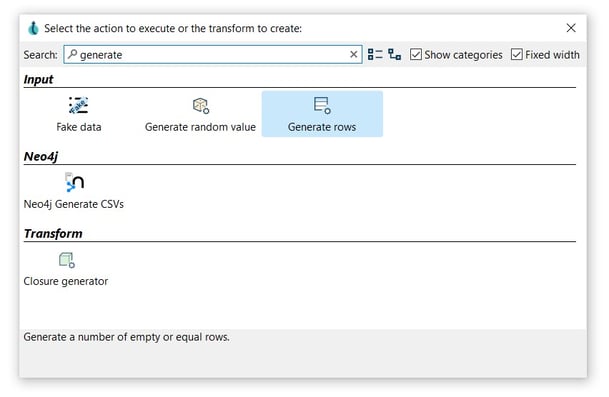
In this case, we are going to add a Generate rows transform. This transform allows us to generate a number of empty rows (though you could add fixed-value fields ). To do so, Search 'generate' -> Generate rows.
Now it’s time to configure the Generate rows transform. Open the transform and set your values as in the following example:
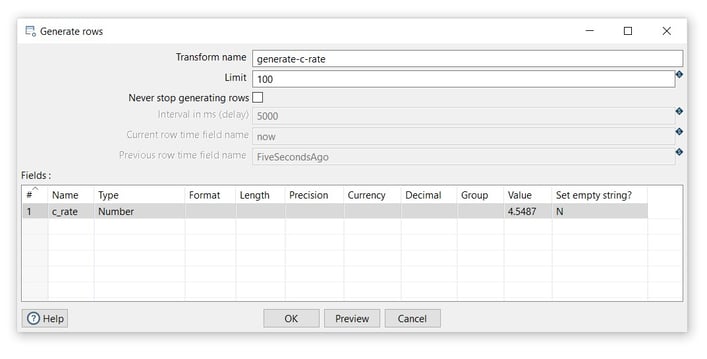
- Transform name: choose a name for your transform, just remember that the name of the transform should be unique in your pipeline (generate-c-rate).
- Limit: set the maximum number of rows you want to generate (100).
- Name: the name of the field (c_rate).
- Type: select the filed type (Integer).
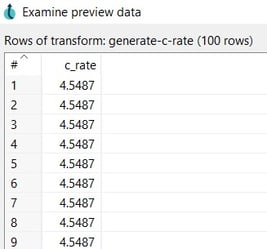
- Value: specify a value (4.5487).
- Click on the Preview button to see the generate field and the OK button to save.
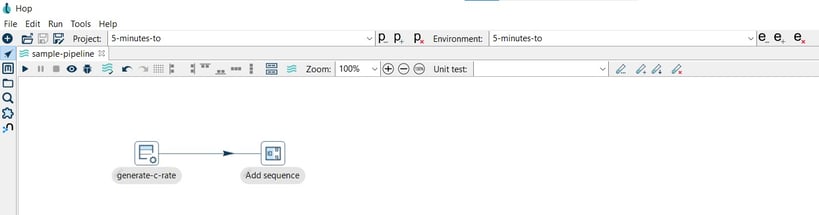
Next step? Add and connect an Add sequence transform. The Add sequence transform adds a sequence to the Hop stream. A sequence is an ever-changing integer value with a specific start and increment value.
To connect the "Generate Rows" and "Add Sequence" transforms, we'll create a "hop", the black arrow you see below. There are multiple ways to create hops, but the easiest ways are dragging from the first to the second transform while holding down the shift key or dragging from the first to the second transform while holding down your scroll wheel instead of your primary mouse button.
To configure the sequence open the transform and set your values as in the following example: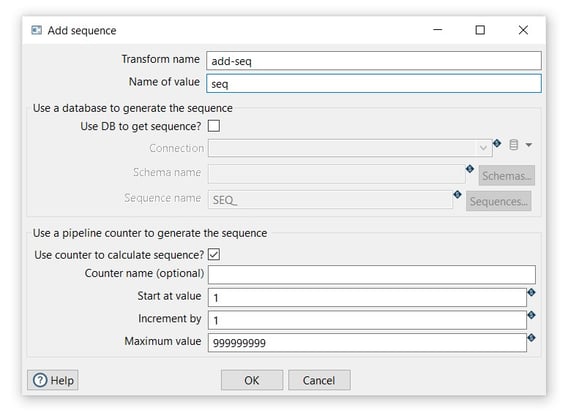
 Transform name: The name of the transform as it appears in the pipeline workspace. This name must be unique within a single pipeline (add-seq).
- Name of value: Name of the new sequence value that is added to the stream (seq).
- Start at: The value to begin the sequence with (1).
- Increment by: The amount by which the sequence increases or decreases (1).
- Click OK to save.
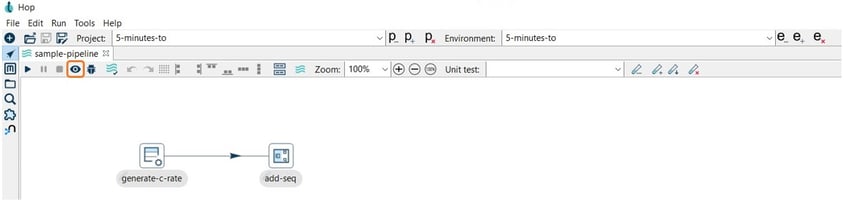
To preview the result of a pipeline to see how it performs, select the transform and use the Preview the pipeline option:

The results are shown as follows: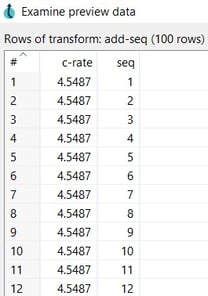
 TIP: As you can see, there is a long and varied list of transforms, but don't be alarmed, you'll get to know them as you go. Each transform has a "Help" button in the lower left corner, and you can also consult the Apache Hop documentation.
 Let us know in the comments which transforms you'd like to see highlighted in a later blog post.
Step 5: Run the pipeline
Finally, run your workflow by clicking on the Run -> Launch option: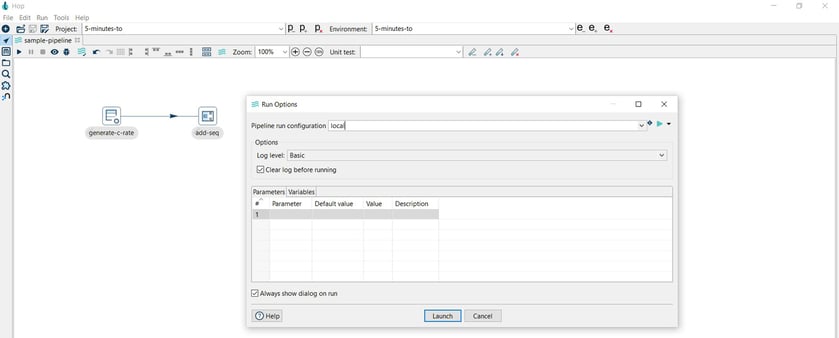
TIP: Note the selected value in the Pipeline run configuration field: local. Hop workflows and pipelines can run on the native Hop engine, both locally and remotely. Pipelines can also run on Apache Spark, Apache Flink, and Google Dataflow through the Apache Beam runtime configurations.
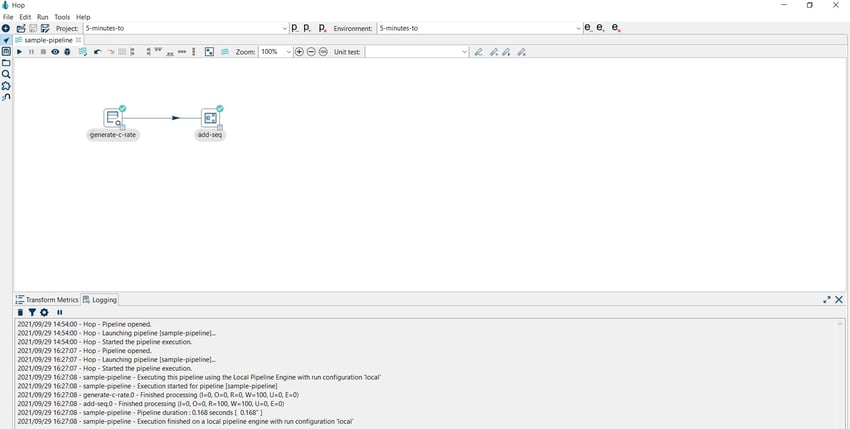
You can verify the execution results in the Transform Metrics and Logging tabs.
Next steps
You are now ready to start working with Apache Hop.
Before you can run your Apache Hop project in production, you'll need to manage it in version control.
You'll want to create unit tests to make sure your workflows and pipelines not only run without errors, but also process your data exactly the way you want them to. Check our guide on unit testing for more information.
If you want to periodically run workflows and pipelines, Apache Hop integrates with any scheduler that can kick off a script, command or container. Check our guide on running Apache Hop workflows and pipelines from Airflow Airflow for an example.
Conclusion
Not only have you built and run your first Apache Hop pipeline, but you've also done it like a pro!
Working with correctly configured projects and environments will save you a lot of headaches further down the road.
Let us know in the comments if you'd like to see more hands-on guides like this.

Want to find out more? Download our free Hop fact sheet now!


Blog comments